Introduction
In the world of software development, encountering obstacles while accessing development servers for real-time troubleshooting is not uncommon. Many developers have experienced the frustration of being unable to swiftly diagnose and rectify issues that arise within their server environments. The solution, Port Forwarding.
Just recently, my colleagues and I found ourselves in a similar predicament. We urgently needed to troubleshoot issues related to database connections and data manipulations within one of our lower environment servers. Fortunately, we discovered a lifeline in the form of AWS Systems Manager (SSM).
AWS SSM offers a robust solution, enabling seamless connectivity and streamlined debugging processes directly from your local machine. In this blog post, we delve into the intricacies of SSM port forwarding, empowering you to master troubleshooting within your server environments with ease.
Prerequisites
Before diving into the setup, ensure you have the following prerequisites:
- An AWS Account (Authenticated to AWS CLI in your local terminal)
- AWS Session’s Manager plugin (you can find it here)
- AWS CLI (here)
- PGAdmin4 (here)
- AWS System’s Manager initial set up (here)
Step 1: Creating Infrastructure
To enable port forwarding, we can start by setting up a basic private network:
resource "aws_vpc" "bastion_project_vpc" {
  cidr_block           = "10.0.0.0/16"
  enable_dns_hostnames = true
  enable_dns_support   = true

  tags = {
    Name = "bastion_project_vpc"
  }
}
resource "aws_subnet" "bastion_project_subnet_1" {
  vpc_id            = aws_vpc.bastion_project_vpc.id
  cidr_block        = "10.0.1.0/24"
  availability_zone = "us-east-1c"

  tags = {
    Name = "ec2 subnet for bastion"
  }
}
resource "aws_route_table" "internal" {
  vpc_id = aws_vpc.bastion_project_vpc.id
  route {
    cidr_block = "10.0.0.0/16"
    gateway_id = "local"
  }

}
resource "aws_route_table_association" "internal" {
  subnet_id      = aws_subnet.bastion_project_subnet_1.id
  route_table_id = aws_route_table.internal.id
}
This setup ensures local communication within the VPC.
Step 2: Creating VPC Endpoints
VPC Endpoints leverage AWS PrivateLink for intra-network communication. Required endpoints include:
- S3 Gateway – this is a gateway endpoint that is required for SSM agent patching that can be scheduled or opted out of in your systems manager console.
- RDS – endpoint for RDS service
- SSM – endpoint for system’s manager service
- SSMMessages – required to connect to your instances through a secure data channel using Session Manager
- Ec2Messages – Allows communication between SSM agent and SSM service.
resource "aws_security_group" "vpce_sg" {
  name   = "vpc-endpoints-sg"
  vpc_id = aws_vpc.bastion_project_vpc.id
}
resource "aws_security_group_rule" "vpce_sg_rule_ingress" {
  type              = "ingress"
  from_port         = 443
  to_port           = 443
  protocol          = "tcp"
  cidr_blocks       = ["10.0.0.0/16"]
  security_group_id = aws_security_group.vpce_sg.id
}
resource "aws_security_group_rule" "vpce_sg_rule_egress" {
  type                     = "egress"
  from_port                = 443
  to_port                  = 443
  protocol                 = "tcp"
  source_security_group_id = aws_security_group.bastion_sg.id
  security_group_id        = aws_security_group.vpce_sg.id
}

resource "aws_vpc_endpoint" "rds_endpoint" {
  vpc_id              = aws_vpc.bastion_project_vpc.id
  vpc_endpoint_type   = "Interface"
  service_name        = "com.amazonaws.${var.region}.rds"
  security_group_ids  = [aws_security_group.vpce_sg.id]
  subnet_ids          = [aws_subnet.bastion_project_subnet_1.id, aws_subnet.db_subnet_1.id, aws_subnet.db_subnet_2.id]
  private_dns_enabled = true

}
resource "aws_vpc_endpoint" "ssm_endpoint" {
  vpc_id              = aws_vpc.bastion_project_vpc.id
  vpc_endpoint_type   = "Interface"
  service_name        = "com.amazonaws.${var.region}.ssm"
  security_group_ids  = [aws_security_group.vpce_sg.id]
  subnet_ids          = [aws_subnet.bastion_project_subnet_1.id, aws_subnet.db_subnet_1.id, aws_subnet.db_subnet_2.id]
  private_dns_enabled = true

}
resource "aws_vpc_endpoint" "ssm_messages_endpoint" {
  vpc_id              = aws_vpc.bastion_project_vpc.id
  vpc_endpoint_type   = "Interface"
  service_name        = "com.amazonaws.${var.region}.ssmmessages"
  security_group_ids  = [aws_security_group.vpce_sg.id]
  subnet_ids          = [aws_subnet.bastion_project_subnet_1.id, aws_subnet.db_subnet_1.id, aws_subnet.db_subnet_2.id]
  private_dns_enabled = true

}
resource "aws_vpc_endpoint" "ec2_messages_endpoint" {
  vpc_id              = aws_vpc.bastion_project_vpc.id
  vpc_endpoint_type   = "Interface"
  service_name        = "com.amazonaws.${var.region}.ec2messages"
  security_group_ids  = [aws_security_group.vpce_sg.id]
  subnet_ids          = [aws_subnet.bastion_project_subnet_1.id, aws_subnet.db_subnet_1.id, aws_subnet.db_subnet_2.id]
  private_dns_enabled = true

}
resource "aws_vpc_endpoint" "s3_gateway_endpoint" {
  vpc_id            = aws_vpc.bastion_project_vpc.id
  vpc_endpoint_type = "Gateway"
  service_name      = "com.amazonaws.${var.region}.s3"
  route_table_ids   = [aws_route_table.internal.id]
}
Step 3: Bastion Host and Security Group
Set up a bastion host and corresponding security group:
resource "aws_instance" "bastion_host_rds" {
  subnet_id                   = aws_subnet.bastion_project_subnet_1.id
  instance_type               = "t3.micro"
  ami                         = data.aws_ami.amazon_linux.id
  associate_public_ip_address = false
  iam_instance_profile        = aws_iam_instance_profile.bastion_iam_profile.name
  security_groups             = [aws_security_group.bastion_sg.id]

  tags = {
    Name = "bastion_host_rds"
  }
}
data "aws_ami" "amazon_linux" {
  most_recent = true
  owners      = ["amazon"]
  filter {
    name   = "name"
    values = ["amzn2-ami-hvm-*-x86_64-gp2"]
  }
}

resource "aws_security_group" "bastion_sg" {
  name   = "ec2-bastion-sg"
  vpc_id = aws_vpc.bastion_project_vpc.id

  ingress {
    from_port       = 443
    to_port         = 443
    protocol        = "tcp"
    security_groups = [aws_security_group.vpce_sg.id]
  }
  ingress {
    from_port       = 5432
    to_port         = 5432
    protocol        = "tcp"
    security_groups = [aws_security_group.vpce_sg.id]
  }
  egress {
    from_port       = 5432
    to_port         = 5432
    protocol        = "tcp"
    security_groups = [aws_security_group.rds_sg.id]

  }
  egress {
    from_port       = 443
    to_port         = 443
    protocol        = "tcp"
    security_groups = [aws_security_group.vpce_sg.id]
  }

}
Step 4: Instance Profile
Create an instance profile with necessary IAM roles and policies:
resource "aws_iam_instance_profile" "bastion_iam_profile" {
  name = "bastion_iam_profile"
  role = aws_iam_role.bastion_iam_role.name
}
resource "aws_iam_role" "bastion_iam_role" {
  name               = "bastion_iam_role"
  assume_role_policy = data.aws_iam_policy_document.bastion_iam_role_policy_document.json
}
data "aws_iam_policy_document" "bastion_iam_role_policy_document" {
  statement {
    actions = ["sts:AssumeRole"]
    principals {
      type        = "Service"
      identifiers = ["ec2.amazonaws.com"]
    }
  }
}
resource "aws_iam_policy_attachment" "ssm_core_policy_attach" {
  policy_arn = "arn:aws:iam::aws:policy/AmazonSSMManagedInstanceCore"
  roles      = [aws_iam_role.bastion_iam_role.name]
  name       = "ssm_core_policy_attach"
}
resource "aws_iam_policy_attachment" "rds_policy_attach" {
  policy_arn = "arn:aws:iam::aws:policy/AmazonRDSFullAccess"
  roles      = [aws_iam_role.bastion_iam_role.name]
  name       = "rds_policy_attach"
}
resource "aws_iam_policy_attachment" "ssm_patch_policy_attach" {
  policy_arn = "arn:aws:iam::aws:policy/AmazonSSMPatchAssociation"
  roles      = [aws_iam_role.bastion_iam_role.name]
  name       = "ssm_patch_policy_attach"
}
There are three required policies to include:
- AmazonSSMPatchAssociation
- AmazonRDSFullAccess
- AmazonSSMManagedInstanceCore
Step 5: Database Setup
Set up the required infrastructure for the database:
resource "aws_security_group" "rds_sg" {
  name   = "rds-sg"
  vpc_id = aws_vpc.bastion_project_vpc.id

}
resource "aws_security_group_rule" "rds_ingress_5432" {
  type                     = "ingress"
  from_port                = 5432
  to_port                  = 5432
  protocol                 = "tcp"
  source_security_group_id = aws_security_group.bastion_sg.id
  security_group_id        = aws_security_group.rds_sg.id
}

# Create the RDS PostgreSQL database instance
resource "aws_db_instance" "rds_instance" {
  allocated_storage      = 10
  engine                 = "postgres"
  engine_version         = "11"
  instance_class         = "db.t3.micro"
  username               = "master"
  password               = "password"
  db_subnet_group_name   = aws_db_subnet_group.rds-subnet-group.name
  vpc_security_group_ids = [aws_security_group.rds_sg.id]
  identifier             = "postgresql"
  skip_final_snapshot    = true
  deletion_protection    = false
  multi_az               = false

}
# Create the database subnet group, associated with the created subnet
resource "aws_db_subnet_group" "rds-subnet-group" {
  name       = "rds-subnet-group"
  subnet_ids = [aws_subnet.db_subnet_1.id, aws_subnet.db_subnet_2.id]
}
# Create a subnet for the RDS subnet group
resource "aws_subnet" "db_subnet_1" {
  vpc_id            = aws_vpc.bastion_project_vpc.id
  cidr_block        = "10.0.3.0/24"
  availability_zone = "us-east-1a"
}
# Create a subnet for the RDS subnet group
resource "aws_subnet" "db_subnet_2" {
  vpc_id            = aws_vpc.bastion_project_vpc.id
  cidr_block        = "10.0.2.0/24"
  availability_zone = "us-east-1b"
}
Database attributes.
- Allocated storage – the volume of your database in GB.
- Engine – your preferred database engine. i.e. Postgres, MariaDB, MySql.
- Engine version – version of your preferred database engine
- Instance class – the size of the instance the database runs on.
- Username -set a username for your admin user.
- Password – set a password for your admin user.
- Identifier – this is how your database will be named on AWS console.
Step 6: Initiating Port Forwarding
Authenticate to AWS in your terminal and run the appropriate script:
## Linux/Mac
aws ssm start-session --region us-east-1 \
--target $(aws ec2 describe-instances --filters "Name=tag:Name,Values=bastion_host_rds" --query "Reservations[*].Instances[*].InstanceId" --output text --region us-east-1) \
--document-name AWS-StartPortForwardingSessionToRemoteHost \
--parameters '{"portNumber":["5432"], "localPortNumber":["12345"], "host":['"$(aws rds describe-db-instances --db-instance-identifier postgresql --query "DBInstances[*].Endpoint.Address" --output text --region us-east-1)"']}'

## Windows
aws ssm start-session --region us-east-1 --target $(aws ec2 describe-instances --filters "Name=tag:Name,Values=bastion_host_rds" "Name=instance-state-name,Values=running" --query "Reservations[*].Instances[*].InstanceId" --output text --region us-east-1) --document-name AWS-StartPortForwardingSessionToRemoteHost --parameters portNumber="5432",localPortNumber="12345",host="$(aws rds describe-db-instances --db-instance-identifier postgresql --query "DBInstances[*].Endpoint.Address" --output text --region us-east-1)"
Instance ID and Database endpoint values can be swapped out for hardcoded values.
Step 7:
In your terminal you will see:

Leave this terminal running.
Step 8: Database connection
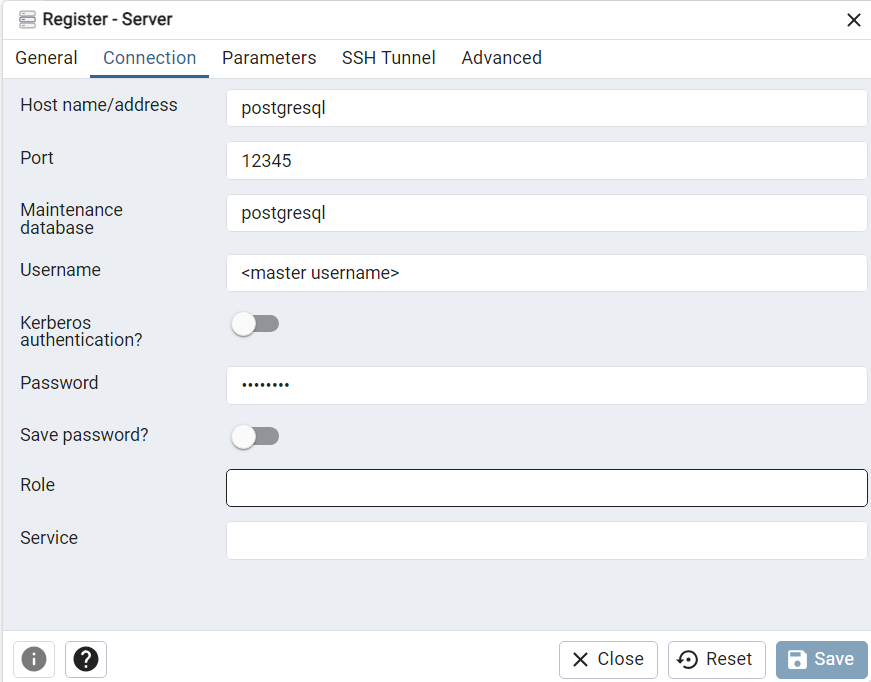
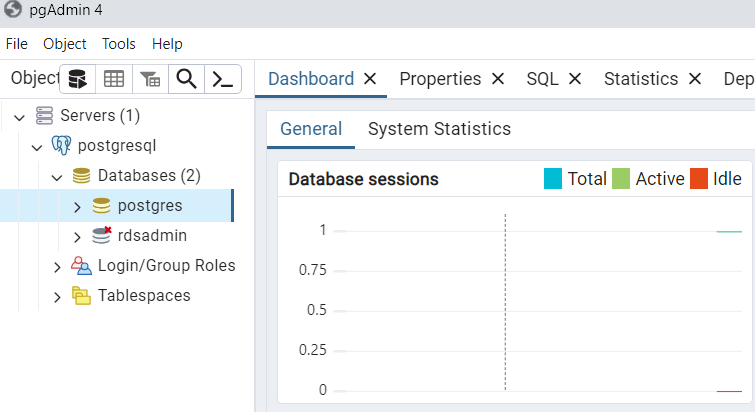
Launch PGAdmin4 and add a new server with your database details.

We can now access the database.

By following these steps, you can seamlessly troubleshoot and debug your development servers directly from your local environment using AWS Systems Manager.
